Getting Started with Filament Printing - Printing
Your first filament print
Printing your first model
I will assume you have a relatively modern printer.
Many recent machines automate a large part of the setup process through sensors and built-in calibration routines.
I personally use a relatively modern printer with extensive automation features, so most calibration steps are handled automatically.
Because of this, I will mainly focus on beginner-friendly workflows rather than advanced manual tuning or hardware modifications.
Printer setup and calibration
Before your first print, I strongly recommend following your printer manufacturer’s setup guide carefully. It will usually guide you through physical assembly, firmware updates, Wi-Fi or network setup, slicer installation and printer connection, automatic calibration routines.
A first model to print
Small test models save time, filament, and frustration when something is misconfigured. These prints help verify bed adhesion, print quality, dimensional accuracy, temperature and cooling settings.
Common beginner calibration models include:
- Benchy - the most common 3D printing benchmark model, useful for identifying common print quality issues
- Calibration cube - simple model used to check dimensional accuracy and general print consistency
- Temperature tower - helps determine suitable printing temperatures for a filament
- First-layer test - used to verify bed leveling and first-layer adhesion
- All In One Calibration Test - combines multiple calibration checks into a single print
Slicing
Slicer software
A 3D printer does not directly understand a 3D model file such as .stl, .obj, or .3mf.
Before printing, the model needs to be converted into instructions the printer can follow. This process is called slicing.
Most slicers also allow you to preview the print before starting so you can inspect how many layers will be printed, where supports will be added, how much filament will be used, estimated printing time, possible issues with the model orientation…
Common slicers include:
- Bambu Studio - Bambu Lab’s slicer, designed for their printers and ecosystem
- PrusaSlicer - Prusa Research’s slicer, also widely used with many non-Prusa printers
- OrcaSlicer - community-driven slicer based on Bambu Studio, popular for its advanced calibration and tuning features
- Cura - one of the oldest and most widely supported general-purpose slicers
I suggest you start with the slicer recommended by your printer manufacturer.
A basic slicing workflow looks like:
- Import your model into the slicer
- Choose your printer
- Select your filament type and profile
- Adjust settings if needed
- Slice the model
- Preview the generated layers
- Send the file to your printer
Supports
3D printers build objects layer by layer from the bottom upwards. Because of this, the printer cannot print in empty space. If a part of a model extends too far outward without anything underneath it, the freshly printed plastic has nothing to attach to and can fail. These unsupported areas are called overhangs.
Supports are temporary structures that the slicer creates underneath these areas to give the print something to build on.
After printing, supports are removed manually. Depending on the material and settings, this can range from a few seconds of cleanup to a significant post-processing step.
When should I use supports?
Use supports when:
- A part of the model starts in mid-air
- The overhang angle is too steep for your printer and material
- The model has bridges or floating sections
- The surface quality underneath the overhang matters
Avoid supports when possible because they:
- Increase print time
- Use extra filament
- Leave marks on the model
- Require cleanup after printing
A good model orientation can often remove the need for supports.
Modern slicers can automatically detect areas that need support, but the automatic result is not always perfect. Learning to check the preview before printing will save filament and time.
I personally tend to avoid using supports whenever possible, preferring models that do not need them, or by splitting and gluing the model afterward.
Slicer parameters
Slicers contain hundreds of settings, but you only need to understand a few important ones to get started.
Many modern model repositories provide files in the .3mf format, which can include recommended print settings in addition to the model itself.
Layer height
Layer height controls how thick each printed layer is.
Smaller layers increase detail and produce smoother surfaces, but also increase print time. Larger layers have the opposite effect.
The layer height you can use depends partly on your nozzle size. The nozzle is the small opening where melted filament exits the printer. The most common nozzle size for hobbyist printers is 0.4 mm.
For example:
- 0.4 mm nozzle: commonly used with layer heights around 0.08 mm to 0.28 mm
- 0.2 mm nozzle: allows finer details with smaller layers
- 0.6 mm or 0.8 mm nozzle: allows faster printing and stronger walls, but with less fine detail
For comparison, here is a Benchy sliced in Bambu Studio, I zoomed in on the top of the chimney:
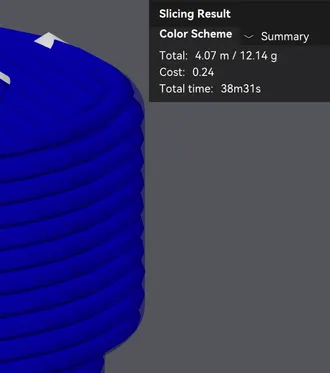
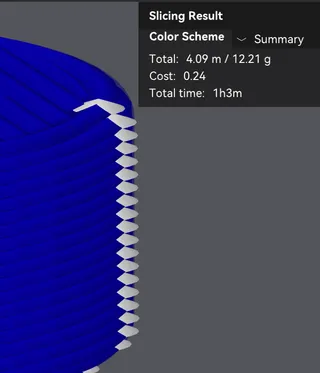
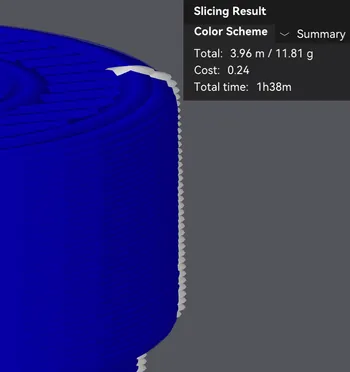
Benchy sliced with layer heigth 0.24mm, 0.16mm, and 0.08mm
Infill
Infill is the internal structure inside a print.
A 3D printed object is usually not completely solid. Instead, the slicer creates a pattern inside the object to provide strength while saving material.
Higher infill makes parts stronger, increases weight, uses more filament, takes longer to print and vice versa.
Common values:
- 5-10%: decorative objects
- 10-25%: general purpose prints
- 30%+: stronger functional parts
The infill pattern also affects the final result. Common patterns include:
- Grid
- Gyroid
- Cubic

Reddit: Infill patterns
For most everyday prints, the default infill settings are usually enough.
An example use of a less common pattern: I printed wargames terrain with “lightning”, resulting in a faster and cheaper print.
Walls / Perimeters
Walls are the outer shells of your print.
Increasing wall count often improves strength more than increasing infill because the outside layers carry a large amount of the load.
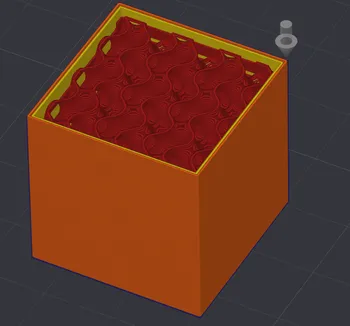
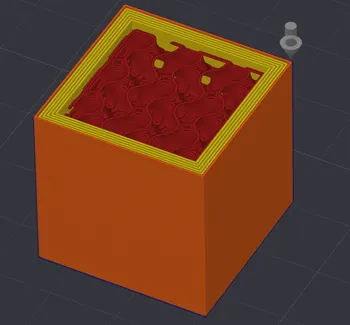
Benchy sliced with wall loops set to 3 vs 6
Print speed
Higher print speeds reduce print time but can reduce print quality and reliability.
For your first prints, the default values provided by your printer profile are usually a good starting point.
Printer parameters
Most modern printers come with pre-configured printer profiles, so you rarely need to adjust printer-specific settings yourself.
The main things to be aware of are:
- Build volume: the maximum size your printer can produce.
- Nozzle size: affects the level of detail and print speed.
- Enclosure: helps with noise, safety, and allows printing more demanding materials such as ABS or ASA.
Filament parameters
Filament profiles contain settings specific to the material you are printing with.
Modern slicers usually include ready-made profiles for common materials, so you can often start printing without changing anything.
The most important filament parameters are:
- Nozzle temperature: how hot the filament is melted.
- Bed temperature: helps the first layer stick to the build plate.
- Cooling: controls how quickly the filament solidifies after being deposited.
- Flow rate: adjusts how much material is extruded.
- Filament diameter: usually 1.75 mm on consumer printers.
Each manufacturer has their own recommended temperatures. They are typically printed on the spool or listed on the product page.
Moisture
Many filaments absorb moisture from the air over time. Wet filament can cause stringing, surface defects, or poor layer adhesion.
Some materials are much more sensitive than others:
- PLA: relatively forgiving
- PETG: moderately sensitive
- TPU: sensitive
- Nylon: extremely sensitive
If a spool has been exposed to humid air for a long time, drying it can often improve print quality significantly.
For this reason, many hobbyists store filament in sealed containers or bags with desiccant packs.
For your first prints, don’t worry too much about moisture. If a new spool prints well, simply store it somewhere dry when not in use.
Here is my setup:
- filament spools inside cereal boxes
- reusable silica gel stored in printed containers inside the cereal boxes
- more silica in containers inside the AMS.
- digital hygrometer to measure humidity
Wet silica gel is orange and will turn green once humid. I dry the silica gel with the spool drying feature of my printer every few months.
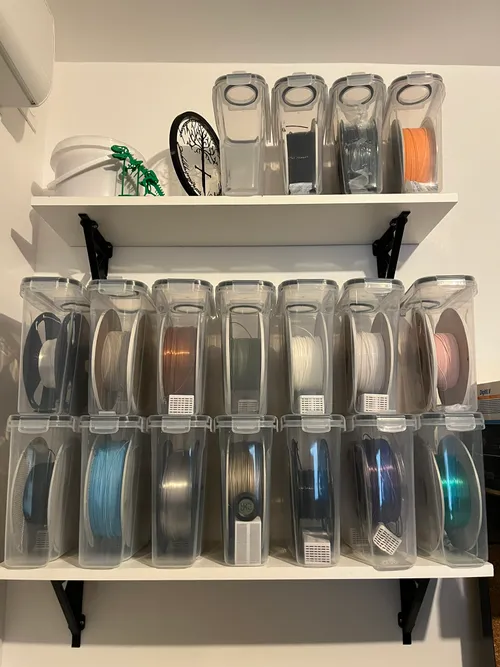
My filament setup
Before starting your print
Before starting a print, take a moment to verify a few things:
- The correct printer and filament profiles are selected in the slicer.
- The model fits within the build volume.
- Supports are enabled if required.
- The filament is loaded correctly.
- The build plate is clean.
If you have a texture PEI plate, you may spread white paper glue before the print on your build plate to increase adhesion. Some people also use IPA alcohol for adhesion.
It is also worth checking the slicer’s layer preview. This allows you to spot obvious issues such as missing supports, floating parts, or an incorrect orientation before wasting time and material.
After a few successful prints, these checks quickly become routine.
During the print
Once the print starts, the most important moment is the first few layers.
A good first layer should:
- Stick evenly to the build plate
- Have consistent lines of filament
- Not be too compressed or too far from the bed
If the first layer looks wrong, it is usually better to stop the print and fix the issue rather than waste hours of printing.
Common things to check during a print:
- The filament is feeding correctly
- The print has not detached from the build plate
- There are no unusual noises or visible problems
Modern printers often include cameras or failure detection features, but they are not perfect. A quick visual check can still prevent failed prints.
You do not need to watch the printer constantly. Once you are confident your settings are reliable, many prints can run unattended.